Last Sunday, I had a ball teaching the Brisbane Brown Owls group how to make "Ningyogami" - Japanese paper dolls. I think everyone was surpised at how easy they were to do.
What you need
* “Kimono” paper (I prefer Japanese Yuzen or chiyogami) about 5.5 x 12.5 cm
* “Obi” and “collar” paper about 1.5 cm wide, the length doesn’t matter too much. You can use different papers for the obi and collar.
* “Obi-jime” paper (again, I prefer Yuzen or chiyogami), narrower than the “Obi” paper. You can use a few different ones to layer if you like.
* “Hair” and “Fringe” paper – I use Japanese crepe, but a standard crepe paper will do.
* White card for head and body. The head circle is about 2cm in diameter, the body about 3mm wide, length isn’t too important.
* Double-sided tape (you can use glue, but I find tape is less messy).
* Sticky tape
* Scissors
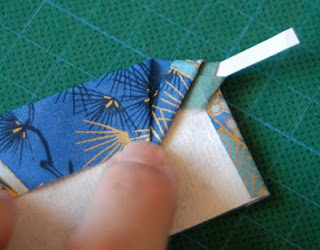
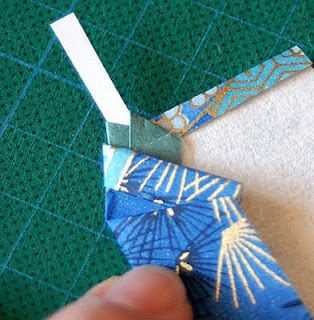
1. Cut a small length of the collar paper and fold it in half to create a narrower strip. Fold this around the “body” to create a collar (actually the collar of the under kimono). Make sure that (as you’re looking down on it) the left goes under the right. This is the way a kimono is worn by all except for the deceased. Run a strip down the length so that it hangs over the edge, you will use this soon.
2. With the wrong side up, fold about 1cm of one end (if the pattern on the paper has a top and bottom, do this at the top).
4. Tape the body and under-kimono collar into the middle so that just a touch of the under-kimono peeks over the top.
7. There may be a corner of the collar that goes further than the rest of the edge. Trim this so that it is all straight.
8. Fold the other side over. To get the angles matching at the top, I find it easier to crease from the bottom up. Crease the straight line up to the point of the slight corner on the other side and then fold in the top to match. This side doesn’t fully cover the other side. There should be a few millimeters of the first side showing. Trim anything that hangs over the side.
9. Put the piece of “obi paper” around the kimono so that it sits just below the collar and covering the angled folds in the kimono (where the angle of the collar change to the straight edge of the kimono). Tape this at the back. The long hair will cover the tape later.
10. Put a decorative piece of “obijime” over the obi. You can do a few of layers of this if you like.
11. Place a bit of the crepe paper on the head to make a fringe. It should sit about half-way down. Make sure that the grain of the crepe is running down, like hair would do. Flip the “head” over and trim off the excess. The trimming doesn’t need to be too perfect, this will get covered by the rest of the hair in the next few steps.
12. Tape the head onto the body leaving a bit of “neck” showing. I use double-sided tape, as this gets stuck to the rest of the hair in a moment.
13. Tape the back of the head onto the hair piece so that there is some space at the top.
15. Do the same on the other side and hold the top of the head.


Tidak ada komentar:
Posting Komentar